1
Steph W. from SEOPressor

👋 Hey there! Would you like to try out this New AI-Powered App that'll...
...help you check your website and tell you exactly how to rank higher?
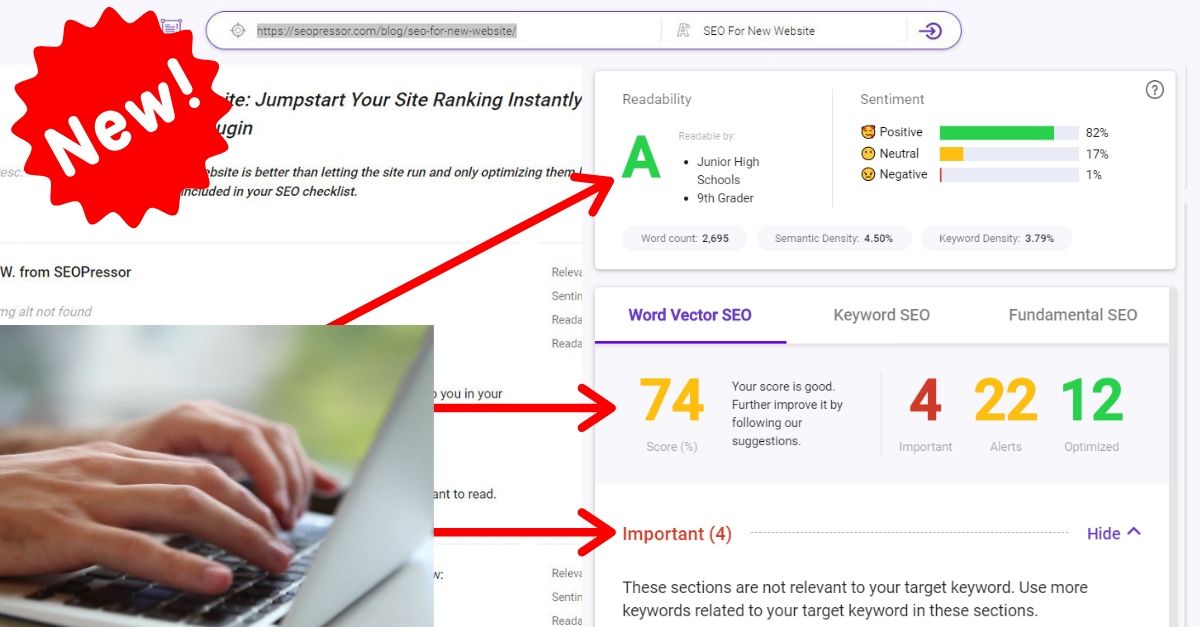

74
score %
SEO Score

Found us from search engine?
We rank high, you can too.
SEOPressor helps you to optimize your on-page SEO for higher & improved search ranking.
By gymosphere on February 4, 2013
Seeing people makes me happy, for some reason – especially when I’m searching for something on the Internet. It somehow gives me that sense of relief whenever I’m trying to find out if a company, organization, product or person is actually legitimate.
Seeing a face attached, eases the tension off a little.
Okay, it also depends whose face it is, but I’m pretty sure I’m not the only one who feels this way.
The point I’m trying to make is that if you’re doing any business online, tying a face with it works better, because people can empathize more and feel that there’s a person behind the business, not some anonymous robot.
That’s why we have Google Authorship by Google – it’s their way of signalling quality and telling us who the author of the content is and what makes them so awesome.
Research have also shown how having a pretty face showing up next to your content in Google’s search results can vastly improve click through rates.

So how do we claim Google Authorship?
First off, you need to verify your Google+ account and make sure it has a profile picture otherwise your face wouldn’t be seen. There are 2 ways to do this:
1) You can do this manually and continue reading the instructions that follow
2) You can use SEOPressor V5 to do it quickly and easily
1) Make sure you have a profile photo with a recognizable headshot.
Our main purpose is to get your face found on SERPs – so this is a definite must.
2) Make sure a byline containing your name appears on each page of your content (for example, “Author: Steven Levy” or “About Steven Levy”).
This way, Google is able to recognize the Author and display it in Search Results:

3) Make sure your byline name matches the name on your Google+ profile
Google will not recognize you if you’re “Steve Levy” on Google+ but your byline name says “Steven Levy” – they have to be exactly the same.
Once you’ve set up your Google+ profile, you need to link it to the content you create.
Replace [profile_url] with the your Google+ profile URL, like this:
<a href="https://plus.google.com/109412257237874861202? rel=author">Google</a>
Your link must contain the ?rel=author parameter. If it’s missing, Google won’t be able to associate your content with your Google+ profile.
Add a reciprocal link back from your profile to the site(s) you just updated.
– Go to your Google+ profile to edit the “Contributor To” section.
– In the dialog that appears, click Add custom link, and then enter the website URL.
– If you want, click the drop-down list to specify who can see the link.
Once you’re done, click ‘Save’.
Alternatively as mentioned earlier, you can skip most of the process just by using SEOPressor V5!
One person can have many websites, and it is incredibly tedious to keep repeating the same above process for every single page!
However, with SEOPressor V5 – all you have to do is copy and paste your URL into one of it’s fields.
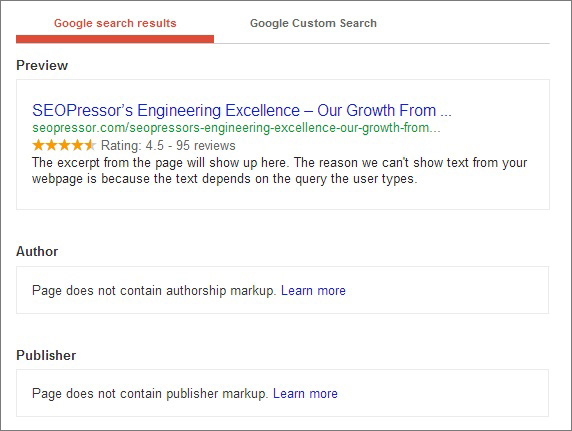
Currently, this is how a standard article would look like when searched upon using Google (Structured Data Testing Tool):
To claim Authorship Markup, follow these steps:
1) Open up your Google+ Profile Page (In a new tab or window, you’ll see why later at step 4)
2) Open up the dashboard of your WordPress site where you have SEOPressor V5 installed
3) Go to “Users” and edit the profile you wish to have displayed
4) Under contact info, copy the URL of your Google+ Profile page from step 1 (it should look something like this: https://plus.google.com/116303555461302881316/posts) into the section, “Google Plus Profile URL”
5) Update Profile
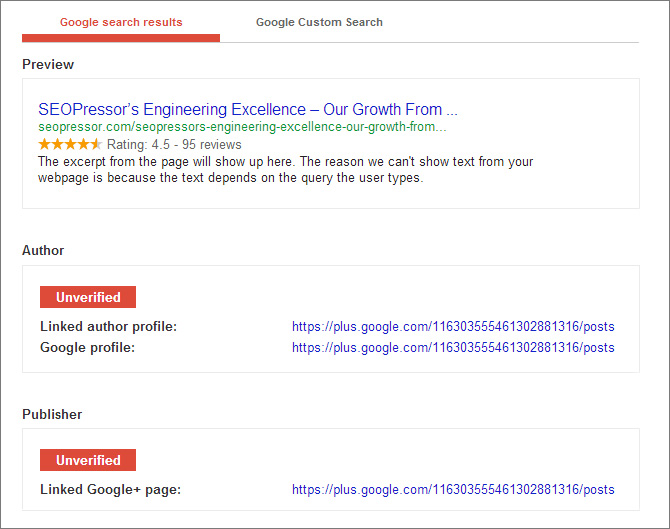
If everything’s done accordingly, then you should get something like this:
Now we add a reciprocal link like we did just now from your profile to your updated website.
– Go to your Google+ profile to edit the “Contributor To” section.
– In the dialog that appears, click Add custom link, and then enter the website URL.
– Save
There you go! It should be verified and you can check it out using the Structured Data Testing Tool so it should look something like this:
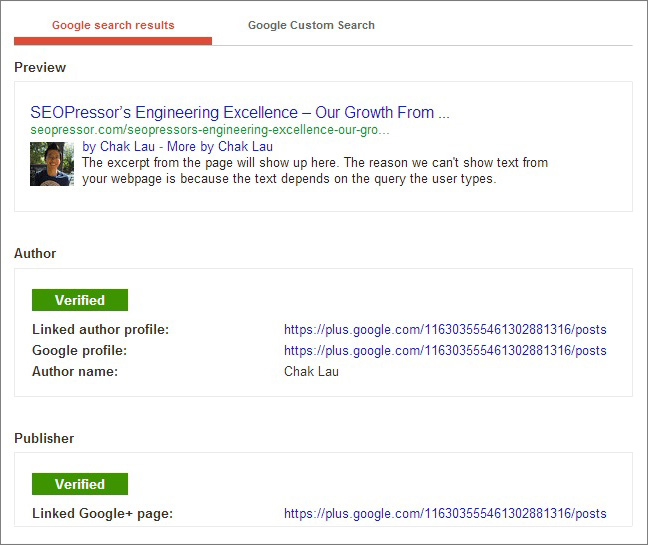
Claim your Google+ Authorship Markup now with SEOPressor V5 and get better click through rates!
Updated: 13 July 2026
Struggling with internal linking?
Wish you could...

Automate internal linking
Use optimized anchor text
Fix 18 issues like orphan pages
Get link reporting and analytics


Save thousands of dollars (it’s 100x cheaper)
Zero risk of Google penalty (it’s Google-approved)
Boost your rankings (proven by case studies)
Rank High With This Link Strategy
Precise, Simplified, Fast Internal Linking.

Subscribe and receive exclusive insider tips and tricks on SEO.
Delivered to you right from the industry’s best SEO team.
Copyright © 2026 SEOPressor. All Rights Reserved.
Powered by Semantics BigData Analytics (SBDA).

