1
Steph W. from SEOPressor


👋 Hey there! Would you like to try out this New AI-Powered App that'll...
...help you check your website and tell you exactly how to rank higher?

99
score %
SEO Score

Found us from search engine?
We rank high, you can too.
SEOPressor helps you to optimize your on-page SEO for higher & improved search ranking.
Online marketing boils down to two things – creating great contents and optimizing them to increase website traffic.
On-page SEO is the first step in doing SEO, before you beef it up even further with off-page factors like building quality backlinks.
But the problem with on-page SEO factors is one, it’s constantly changing. Ways to increase website traffic never stays the same.
And two, implementing them for each facet of your website and contents is a grueling task.
Just keeping track of everything is mind-numbingly tedious, but we still do it because it’s a necessity.
So how do we check every single on-page SEO factors in our whole website while also keeping up with other important tasks and maintain our sanity?
This my friend, is the exact reason why we have SEOPressor Connect.
What SEOPressor does is basically cover every single on-page SEO factors doable across your site. Not just on a content level, mind you.
YOUR WHOLE SITE!
SEOPressor is developed to emulate the way Google rank results as close as possible.
We do this by excessively experimenting how Google actually works in real time, get as many information out of Google’s announcement as well as pry the rest of the stuff they’re not telling from Google’s own search engine patents.
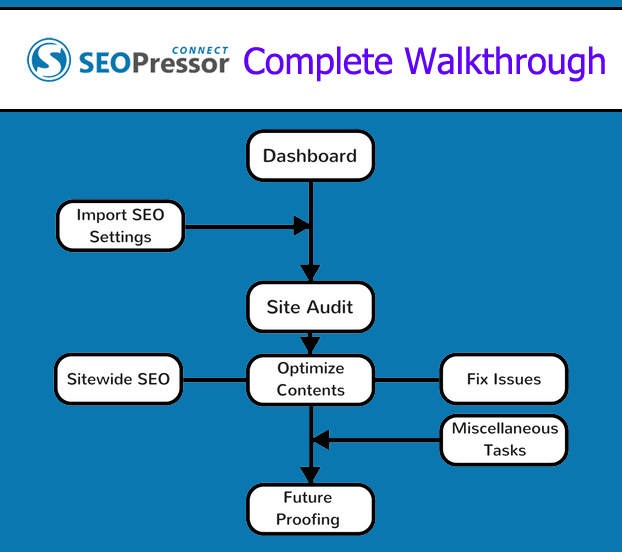
SEOPressor Connect features the most complete toolkit for on-page SEO you can get under one place.
None of them are fillers. What I’m going to do in this page is to walk you through the things you do with SEOPressor Connect.
From the moment you install it, to the first time global setup, down to routine optimization done with each and every new post.
My aim here is to not leave you clueless on where to start when you first land on SEOPressor’s main dashboard.
I will be teaching you on utilizing each and every features and the reason why there are there in the first place a.k.a the problems you might not know need solving.
Because honestly, it’s a shame to see our tool not used to it’s best potential.
Here’s everything I’ll be covering at a glance:
Bear in mind that this walkthrough will mostly cover the activities you can do with the features.
Breadcrumbs showing how to access certain features will be provided but for a more detailed look at the interface, you can refer to the Tutorial.
The way we always imagine how SEOPressor work is similar to having an SEO consultant right by your side.

You just need to focus on creating great contents and SEOPressor will help optimize them for you.
You just need to focus on the most important bit – creating compelling and engaging content while SEOPressor will budge in every now and then, to notify you of optimization opportunities.
Sounds cool doesn’t it?
Well then, let’s get started!

The Dashboard is a centralized control to monitor and improve the site’s SEO.
The Dashboard is the central command of SEOPressor Connect where you can see your overall SEO traffic score at a glance.
It is also where you can access all of SEOPressors’ other features and plugin settings.
Here’s a breakdown of what you can do on the dashboard:
SEOPressor > Dashboard > Average Score & Health
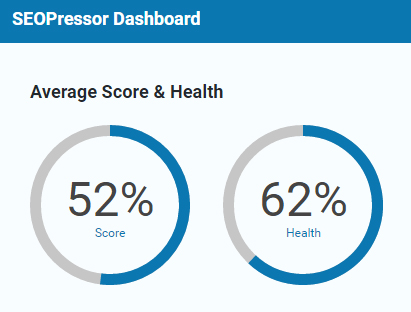
In the Dashboard, the first thing you’ll notice are two meters showing your website’s overall SEO score and health. I’ll explain what these actually mean later in item number 5 (Audit Your Site And Get Improvement Suggestions).
The meter actually requires you to complete a site audit before showing any values so don’t worry if you see it empty the first time you enter SEOPressor.
SEOPressor > Dashboard > News Stream
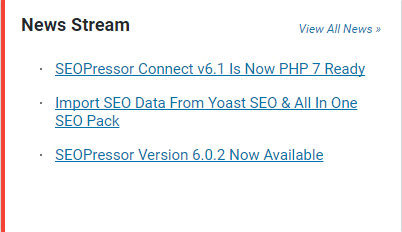
The News Stream will show new updates related to SEOPressor Plugin. I know not a lot of people will care about this, but it’s kind of a big deal.
Why? For one, SEOPressor development team is constantly improving the plugin and will come up with critical fixes, code optimization as well as sweet new features.
Two, SEO as you know it, is a turbulent subject. Google changes all the time and when they do, expect us to catch up soon after.
Updating to the latest patch the moment they come out will give you access to these benefits, for free!
SEOPressor > Dashboard > Bottomside Navigational Buttons
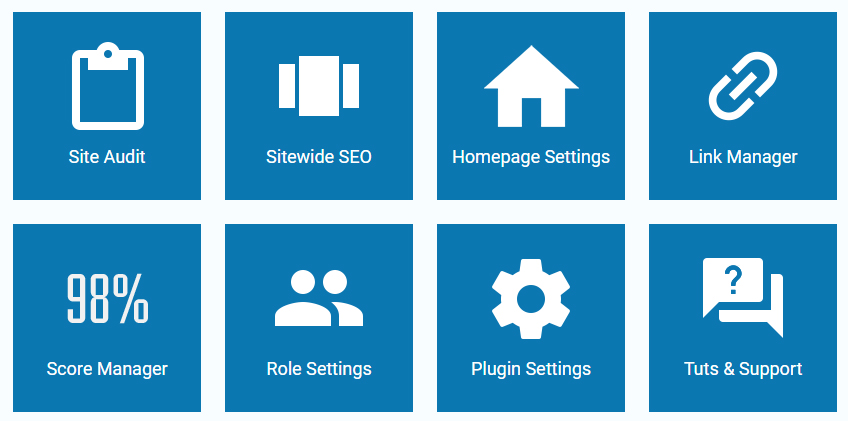
The big blue buttons at the bottom gives you a central quick access to most part of the plugin – Site Audit, Sitewide SEO, Homepage Settings, Link Manager, Score Manager, Role Settings, Plugin Settings, and when things get really out of hand, the Tutorial & Support.
Two major things not actually accessible from the dashboard are first, the On-Page Analysis System – which you can find overlaid on top of your content or page editor.
And second, the Data Importer which can be found under Tools.
I’m not going to pretend like SEOPressor is the only WordPress SEO plugin in the market.
We totally understand the fact that some of our customers are also running other SEO plugins before stumbling upon SEOPressor.
If you are one of them you’ll understand the frustration of redoing all of your SEO settings from the previous plugin into SEOPressor Connect.
To solve this issue, we’ve come up with the SEOPressor Data Importer.
Tools > SEOPressor – Data Importer
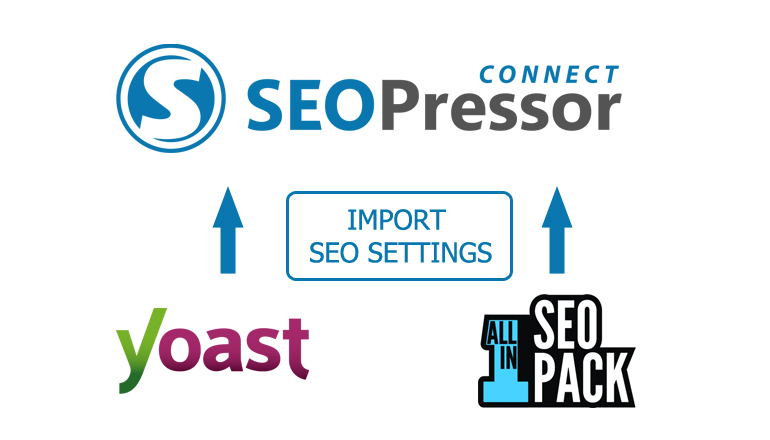
You can now import SEO settings from Yoast and All-In-One SEO so that you don’t have to redo everything all over again.
If you have a previous SEO setup from Yoast or All-In-One SEO Pack the first thing you want to do is to import them.
Importing will override the current settings you have in SEOPressor so that’s why it should be your first step while you still haven’t configured anything yet.
It’ll also help you get a better starting score when doing a website audit a little bit later. If you don’t use these 2 plugins or you’re not interested in importing the setting you can skip this part.
You need to first download and install the importer. After you’ve done you can then start importing them:


Other WordPress SEO plugins mostly operate only on content level.
While it’s surely nice to know the SEO score of each individual content, it’s very important to have a top-down view of your site’s SEO condition.
This way you can pinpoint poorly optimized contents that might be dragging your whole site down despite some other well-performing contents.
In addition to getting an overall SEO score for your website, SEOPressor Connect’s Site Audit feature also scans for issues like broken links, missing meta description or duplicate titles.
Using the Site Audit involves 3 key steps – Analyze, Correct, and Monitor.
SEOPressor > Site Audit > Summary >Analyze Website
Before you get started with everything else, you need to run an analysis of your website. It can be simply done by pressing the “Analyze Site” button in the Site Audit.

It will take some time to compile the result based on the size of your website so you can do something else while waiting for the results.
Expect around 5 minutes for the average website.
Once the analysis is done you can see the following results:
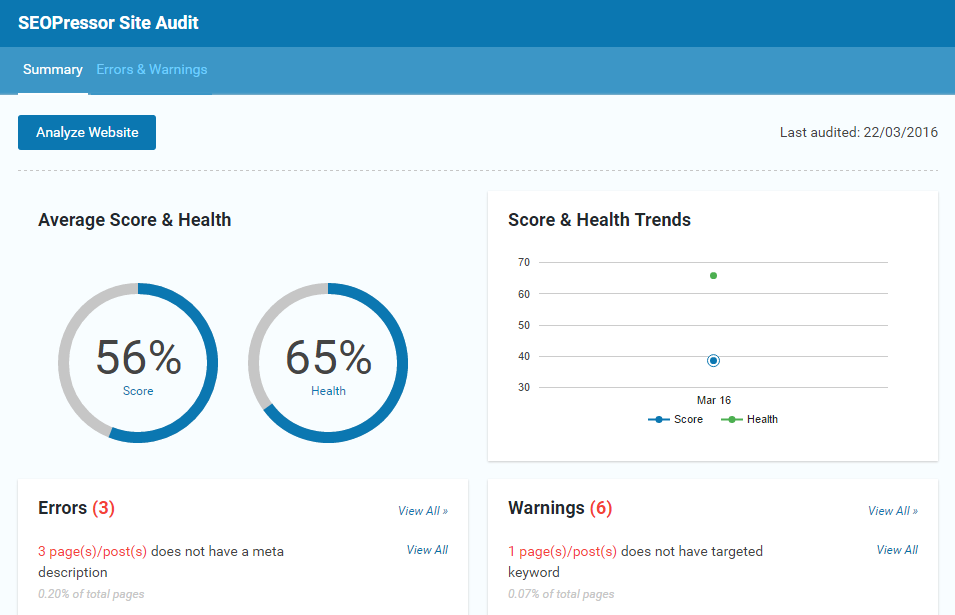
SEOPressor > Site Audit > Errors & Warnings
Errors refers to SEO issues in your sites you need to fix such as broken links or duplicate title.
Warnings on the other hand are optimization opportunities available to improve your SEO score.
Both Errors and Warnings are clumped according to issues in the same category. You can click “View All” at the end of each listed items to break them down to the parts involved.

From here you can click “Fix This” to address each part.

We’ll take a deeper look into fixing Errors in item number 19 and optimizing contents in item number 18.
SEOPressor > Site Audit > Score & Health Trends
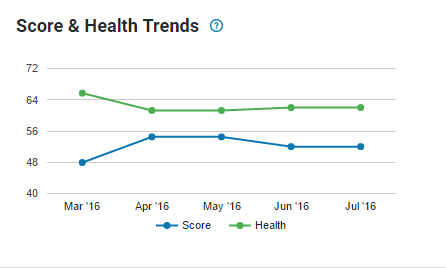
Your site’s Score & Health might be low the first time you did a Site Audit. But as you optimize more contents and fix more issues, your score will be better over time.
The chart provided Score & Health Trends helps you to monitor if your site’s SEO Score is progressing at a preferable rate.
Score & Health Trends plots your site’s Score and Health on a monthly basis.
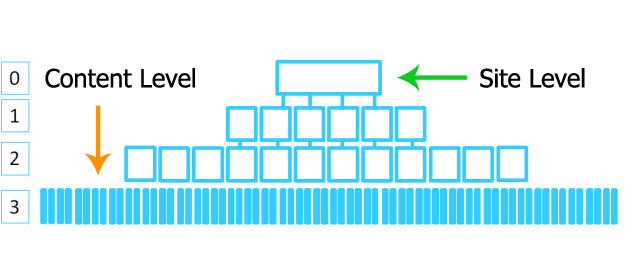
Sitewide SEO affect your website as a whole before you fine-tune every single content.
Before you start doing optimizations on individual posts, it’s a good idea to first set up general SEO settings for the whole site.
In most cases, the global settings only needs to be set up once so you need not worry about it once you’ve configured it once.
SEOPressor > Sitewide SEO > Local SEO

Local SEO is where you put all of the information related to your business as an organisation.
Setting this up will help give you placement on Google’s Local Search Pack as well as Google’s Knowledge Graph card.
You can do this by going to the Sitewide SEO section either through the Dashboard or the side menu.
Go to the first tab that reads Local SEO and you can see 4 submenus:

An XML Sitemap is a file that contains the link to every part of your website.
Having an XML sitemap ensures that every time search engine crawlers visit your website, they are able to crawl every single page through the sitemap.
This is important as without it, they might miss certain pages that does not have links pointing to them.
SEOPressor automatically generate an XML Sitemap for your website as well as update them regularly according to your preference.

To do this, follow these simple steps:
Additionally, you can also do the following:
SEOPressor > Sitewide SEO > Link Policy
In Link Policy, you have the option to turn all of the links you add in your website as nofollow links. Globally applying the nofollow can be useful in certain scenarios.
For example, if your website is a community-style website where everyone is free to add contents to the site, adding nofollow to all links by default will avoid link spammers from hurting your site.
There are two options in the Link Policy:

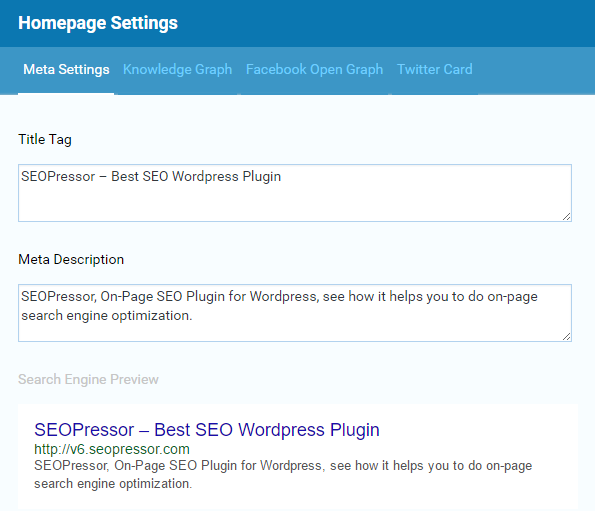
SEOPressor > Homepage Settings > Meta Settings > Title Tag
SEOPressor > Homepage Settings > Meta Settings > Meta Description
Through this setting you can designate and generate machine-friendly meta description for your website:
SEOPressor > Homepage Settings > Knowledge Graph
To be recognized as an entity in Google Knowledge Graph, the least you need to do is to add official information about your website/organisation and designate official social media profiles to be linked:

SEOPressor > Homepage Settings > Facebook Open Graph
If you’re not setting up your site for Open Graph, upon pasting a link to your website in Facebook, it might appear with a wrong image, unoptimized title and a randomly picked snippet.

This might be how your website might look if you share it without optimizing for Open Graph.
By assigning your site’s title, image and description you want using SEOPressor’s Open Graph tool, you can easily revamp the look of your links when they appear on Facebook!
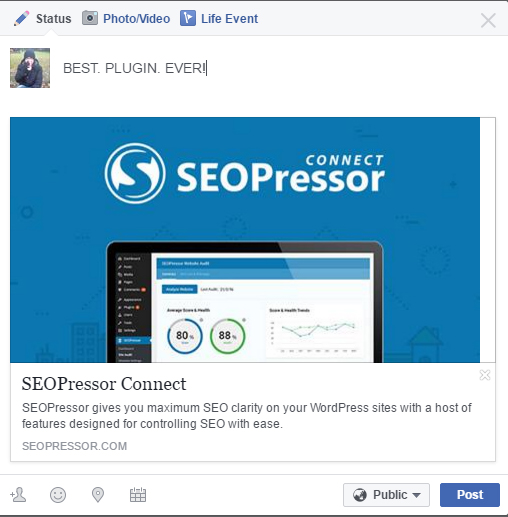
Everything is set up nicely!
SEOPressor > Homepage Settings > Twitter Card

How your website look when Tweeted.
Similar to Facebook, not setting up a Twitter Card for your site will lead to a plain tweet, only displaying your website URL in plain text.
By adding a custom title, description and image in your Twitter Card generator, your website will have a premium look every time people tweet your site!
SEOPressor > Homepage Settings > Meta Settings > Canonical URL

If different URLs with same contents are found, Google will have to pick only one of them to be ranked.
You can help Google choose the one you want using Canonical URL.
Having multiple sites with the exact same content will pose a problem with search engines.
Google for example will only choose one among many duplicate sites to be ranked and they might not be the one you want.
There are cases when duplicate sites are necessary. For example creating mirror sites as backup or creating a test site.
By assigning a canonical URL of the main version among the duplicates to be ranked, Google will know which one to pick.
Homepage Settings > Meta Settings > 301 Redirect URL

Make sure you use redirects when moving your website to a new URL.
There are times when you need to move your website to a whole new URL. But if you do this, search engines will treat your current or old URL as terminated.
Meanwhile on your newly moved website, it will be treated as a new website and your previous ranking and SEO effort will be reset.
Even worse, all of the links pointing to your old website will be broken and potential visitors won’t be able to visit your newly moved site through them.
With SEOPressor’s 301 Redirect URL tool, you can redirect visitors heading for the old URL to the new site.
Through the 301 Redirect, search engines will also acknowledge that the site is moved and keep the ranking score of the previous URL in the new site.
Simply enter the destination URL of the new site in the 301 Redirect URL and you’re set!
SEOPressor > Homepage Settings > Meta Settings > Robot Rules
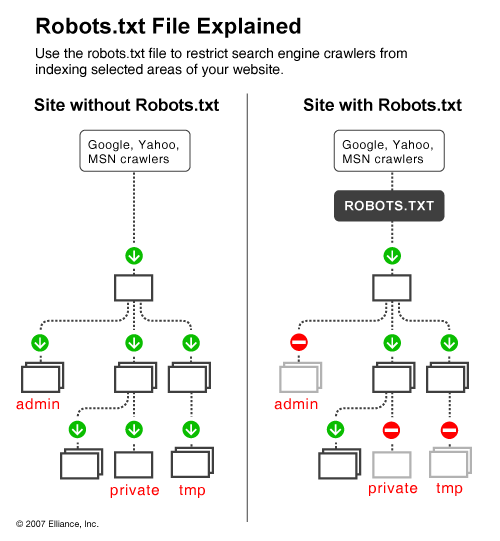
Robots.txt instructs search crawlers on where they should and shouldn’t go. This will allow search engines to view only the best side of your site.
Getting search engine crawlers to visit and index your site most of the time is a good thing.
But there are times when we don’t actually want that. For example if the website is still new and filled only with filler “lorem ipsum” contents or a major reconstruction is in place.
Getting crawled during these times might result in Google giving our site a low score because of the temporary lack of quality content.
This, along with a list of other crawler issues can be avoided by setting up rules to be adhered by the crawlers, which is doable using SEOPressor’s Robot Rules.
There are a number of settings can be done to control what search engine crawler does in our website:

You won’t be using these a lot but keep it in mind just in case the situation calls for it.
You can also apply the same Robot Rules on page level instead of globally. You can do this by editing each particular page and finding the same options under the “Meta” tab of the SEOPressor extension.

Optimizing each of your content based on the unique keywords drives targeted traffic to yout website for free.
While it’s true that you have set up SEO on the site level, it’s important to individually optimize each content separately.
This is because each content can target different keyword than your site to achieve specific goals.
For example, SEOPressor site is all about “WordPress SEO Plugin”. But our blog talks about a lot of different things related to internet marketing.
One post targets “monetizing your blog”. Another post might be catered for people looking to take advantage of current popularity of “pokemon go” for their “local business”.
Targeting and ranking your contents based on different, but related keywords give you the opportunity to boost website traffic from much larger pool of searches.
At a glance, the process to optimize individual content is quite similar to how we optimize the site.
But on closer inspection, content level optimization actually goes deeper and more comprehensive.
SEOPressor > Add New Post > SEOPressor
SEOPressor > Edit Post > SEOPressor
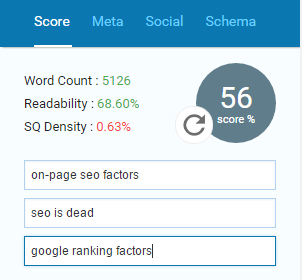
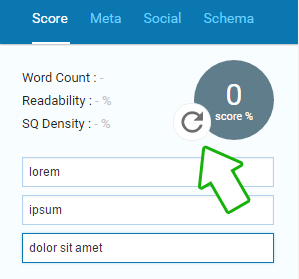
SEOPressor Connect lets you optimize for up to 3 target keywords.
In order to optimize your contents you need to have two things ready:
SEOPressor On-Page Analysis system will analyze your content based on the targeted keywords, calculate an SEO score for it and give a list of suggestions on how you can improve the score.
By optimizing your content based on the suggestions given and getting high SEO Score, the content will be in its best shape to be ranked high for the targeted keywords.
Here’s a step-by-step guide on optimizing your contents:
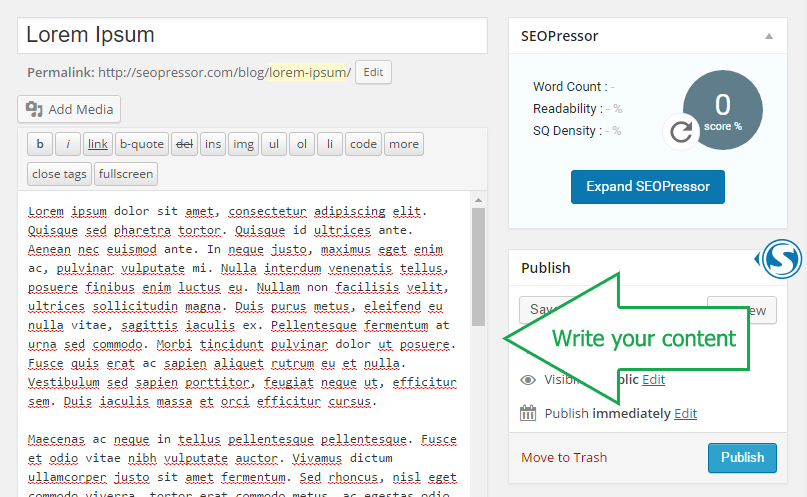
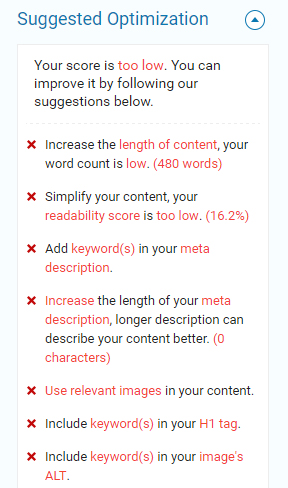
Suggestions may include items such as:
Most of these are similar to their Sitewide SEO counterpart.



Other than optimizing contents, you should also look for errors that can lower your SEO score.
Other than optimizing contents with poor SEO properties, another important thing is to fix problems that might be bringing your site’s SEO score down.
SEOPressor > Site Audit > Errors & Warnings

Most of the issues need fixing are scattered in a different part of your site and requires a different solution.
Thankfully, the suggestions given in the Site Audit’s Error section also provide you with the directions on where to go to fix individual problems.
Just follow the “Fix This” link and apply the appropriate solution.
SEOPressor > Link Manager > Link Profile’s Health
Most fixable issues can directly be fixed through the Site Audit Error section.
Broken Links on the other hand, have a feature dedicated to track and fix broken links across your site. This is to cater to the high amount of links usually present in every website.

The Link Profile’s Health feature lists all of the links present in your whole website along with these details:
Instead of sifting through hundreds of pages with thousands of words each to test the status of the link, SEOPressor does this for you.
Broken links will be listed on top so that they can be easily tracked and fixed wherever they are located.

Preparing your website so that they stay optimized with each new contents will make your job smoother in the long run.
So you’ve finally done it. All existing contents are optimized and all issues fixed.
But how do you keep things this way? New contents are created on a regular basis by your content team.
If you have no control over the quality of each new content, pretty soon you will be overwhelmed by new un-optimized contents and have to repeat the cycle of re-optimization.
Well, we got answers for that problem as well!
SEOPressor > Plugin Settings > Advanced Options > Minimum Publishing Score
Managing a consistent quality is not an easy task especially if you have multiple writers working on content creation across your site.
What can be done in this scenario is to set a minimum SEO score to be achieved for each post prior to publishing.

Setting a minimum SEO score ensures all contents are optimized at the point of creation
By setting the required score to a high enough amount, say 85%, your writers will strive to follow the optimization suggestions in order to boost their content to the required quality.
As they get used to this practice they will soon absorb the best SEO practices naturally in their writing skill and will require less tweaking for every content.
This way you can revamp your content creation to get more optimized contents faster.
Simply go into Plugin Settings and set the desired Minimum Publishing Score.

Keeping track of high performing posts allows you to understand and replicate the success.
When you have a lot of contents written by a lot of writers, there are bound to be differences in performances.
Knowing top performing contents is important to understand more about the process needed to replicate the same performance.
Same goes with writers that can consistently create well-optimized contents on the fly. Useful techniques and pointers can be shared to the rest of the team so that the SEO copywriting skill on average can be raised.
You can do this by utilizing SEOPressor’s Score Manager.
The Score Manager displays all posts along with its Title, Author, Type, Date, Keywords, and SEO Score.
You can rank the results based on highest SEO Score and analyze the Title, Author as well as the targeted keywords for them.
You can then delve further to check each page’s style of writing and SEO properties.
The same can also be done inversely on low performing posts.
Analysis can be done on identifying common mistakes, practices and optimization parts often missing. These can be used as reference for key areas to improve.
SEOPressor > Link Manager > Automatic Smart Linking

Having a consistent internal linking structure is a clear sign to search engines that your site write thematically consistent contents.
This will help search engines to identify your site’s expertise and strength around your niche and rank you higher on related queries.
You can make this work by identifying recurring keywords you’re using across your site and create a content to be linked to from that keyword.
Once the content exists, you can start linking each of that particular keyword found from all over your site.
But by the point of creation of the content, there might already be thousands of those keywords scattered all over your website.
Finding each and every single one of them and linking them one by one is a super boring and tedious job.
This is where SEOPressor Automatic Smart Linking feature comes in.
Simply add a new Smart Linking item under the “Add New” tab under Automatic Smart Linking and fill up the following
Once you’ve set these up, all of the keyword (limited for each page if you designated a maximum number) currently present in your site will be automatically linked to the targeted content.
As an added bonus, all of the keyword in future posts will also be automatically linked upon creation!
Repeat the same process to link other recurring keywords to other posts and you’ll end up with a massively interconnected blog that enhance both user experience as well as your SEO score.
SEOPressor > Dashboard > News Stream

SEO is a constantly evolving field where best SEO practices changes according to Google’s latest algorithm change.
Our team here at SEOPressor keeps a close eye to new changes and incorporate them in the latest version of SEOPressor Connect.
Check out the News Stream under the Dashboard once in a while to get the latest version of SEOPressor Connect that incorporate major changes in Google’s ranking algorithm.
This ensures that you won’t be practicing obsolete SEO practices.
There are still few other things you can do with SEOPressor that might not fit the other categories so I’ll list them up here.
SEOPressor > Add New Post > SEOPressor

One of the best tools to get LSI Keywords suggestions is by using LSIGraph.
But the thing is, LSIGraph limits how many times you can get suggestions per day.
SEOPressor’s own LSI Keywords suggestion feature is actually powered by the LSIGraph engine, only difference is that there’s no limit on how many keywords you want to search for.

You can do so by creating accessing the SEO On-Page Analysis through the WordPress’ Add New Post interface.
Enter up to 3 keywords you need to research and press the circular arrow button to process them. Afterwards, expand the LSI Keyword Suggestions section to get a list of LSI keywords.
You can switch to each of the 3 keywords here to get LSI keywords for all of them.
SEOPressor > Plugin Settings > Plugin Requirements & Activation
If you have a multi-site license for SEOPressor, you can also track the SEO Score and Health for each of your site with SEOPressor installed.
This is especially useful if you have many sub sites and you need a quick way to analyze the score of each of your website at a glance.
SEOPressor > Link Manager > Automatic Smart Linking > Cloaking Folder
Links can play a lot of roles when it comes to website analysis. You can add trackers to links to make it easier for you to analyze metrics such as click-through rates or traffic source.
But doing this usually ends up adding a long gibberish line of code at the end of your link that doesn’t look good for visitors.
So instead of displaying the links manually, you can use the Cloaking Folder feature of Automatic Smart Linking to change the appearance of your link and remove the added tracking URL from user view.
Certain features can break your site’s SEO properties if not configured correctly. One biggest example is the global nofollow meta setting.
The nofollow rule is useful to block search engines from indexing your site when it is under construction.
But if turned on while your website is already up and running, it will make search engines stop indexing new contents and updates from your site. This will negatively impact traffic coming from search engines.
So it is important for every features to be handled only by those who truly understand their functions.
Using the SEOPressor Role Settings allows you to designate who can access what.
A site SEO manager might be given full access to all SEOPressor settings to allow monitoring and improving the general SEO aspect of the site.
While copywriters (especially guest writers from outside of your organisation) can be limited to only able to access the content level On-Page SEO Analysis to be able to optimize their contents.
So we are done with the 28 ways you can use SEOPressor Connect to score every single on-page SEO factors possible across your website.
Accomplishing this will facilitate a better search engine crawling and understanding of your site, allowing them to rank your website high on useful, related keywords.
And that’s not all. With the increased user experience through seamless internal linking as well as consistently updated, engaging and easy to read contents, even human visitors will have a great time browsing through your site.
Happy visitors will return to your site, promote it and might even complete a purchase.
If you already using SEOPressor Connect, use this guide to maximize the usage of the plugin in ways you never imagined possible.
If you still haven’t start optimizing your site, you can sign up as SEOPressor user here.
So what do you think? Are there any other ingenious way you use SEOPressor to increase organic traffic to your site? Be sure to share them in the comments section below.